Spring MVC and the Web Layer
Spring MVCについて
- MVCとは、
Model/View/Controllerの略。 - Spring MVCは、Controllerの部分のみを提供している。
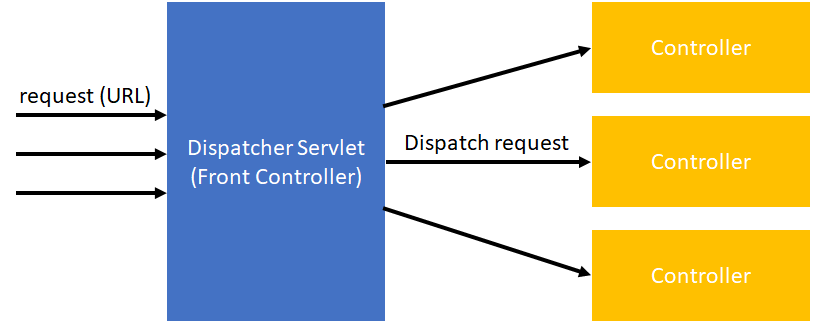
- Front controllerパターンを採用している。
Spring MVCの特徴
- POJOプログラミング
- Testしやすい(Testable)
- 設定にはJava Configを利用
View部分の実装
サーバーサイドレンダリング(Viewの部分)として以下のものをサポートしている(他にもある)。
- Thymeleaf
- FreeMarker
- JSP
- Excel
DispatcherServletとは
SpringにおけるDispatcher Servletとは、すべてのRequestを受け取り、Controllerに処理を振り分ける役割をしている(Front Controllerとも呼ばれる)。

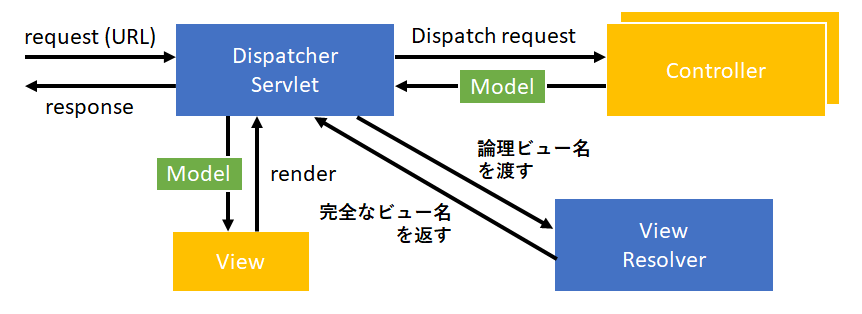
Dispatcher Servletクラスは、受け取ったRequestをもとに各Controller(ビジネスロジック)に処理を割り振り、Modelを受け取る。 受け取ったModelをもとに、View(JSPやThymeLeafなど)をサーバーサイドでレンダリングし、Responseとして返す。
このように、SpringではWeb Layerをできるだけ薄くし、関心事(ビジネスロジックとViewのレンダリング)の分離を行っている。

web application contextとDispatcherServlet
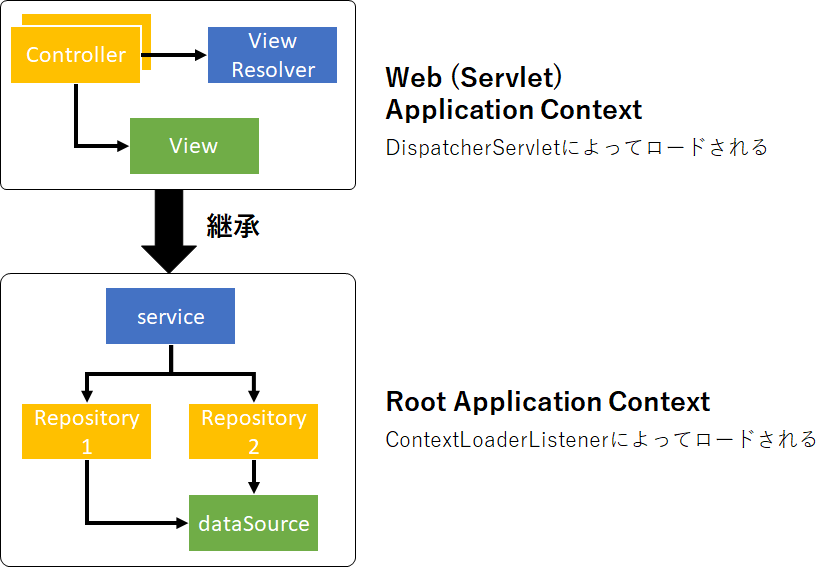
WebApplicationContextはApplicationContextを継承したクラスであり、
- Requestスコープ
- Sessionスコープ
がサポートされている。
DispatcherServletによってWebApplicationContext(ViewResolver、View、Controllerインスタンスを含む)が呼び出される。

Spring Bootでは設定済みのDispacherServletが使われるので、開発者側で独自に用意する必要はない。
参考
Spring Web MVC - 1.2.1. Context Hierarchy
org.springframework.web.servlet - Class DispatcherServlet
What is the difference between ApplicationContext and WebApplicationContext in Spring MVC?
Controllerクラスの定義
@Controllerと@GetMapping(@RequestMappingの仲間)
Controllerクラスに、@Controllerアノテーションをつける。
特定のURLでHTTP GET Requestが送られてきたときに、処理を受け渡すメソッドに対して@GetMappingアノテーションをつける(URLと処理(メソッド)の紐づけ)。
このとき、完全なパスがhttp://localhost:8080/listAccountsだったとすると、論理パスである/listAccountsを@GetMappingで定義する。
Dispatcher Servletが受け取ったRequestを論理パスをもとに、処理を特定のメソッドに振り分けてくれる。
@Controller
public class AccountController {
    @GetMapping("/listAccounts")
    public String list(Model model) {...}
}
論理パスには、ワイルドカードをつけてURLを指定することもできる。
以下にURLの例をいくつか示す。
– /accounts
– /accounts/edit
– /editAccount
– /accounts/*
デフォルトでは、.htmlのようなSuffixは無視される。
– /listAccounts.html
@RequestMappingとは
@RequestMappingを使ってURLと処理(メソッド)の紐づけをする場合、GET、POST、PUT、DELETEのいずれかを指定する必要があった。
Spring v4.3以降では、GET、POST、PUT、DELETEの役割を持つ@RequestMappingの代替となるアノテーションが追加された。
– @GetMapping
– @PostMapping
– @PutMapping
– @DeleteMapping
推奨
基本的に上記の4つを使ってURLと処理(メソッド)の紐づけをControllerクラス内で行う。
Requestパラメータの取得
@RequestParam
@RequestParamアノテーションでRequestパラメータを引数として取得する。
以下の例は、http://localhost:8080/showAccount.htm?entityId=123をRequestとして受け取った例。引数のidには123が格納される。
@Controller
public class AccountController {
    @GetMapping("/showAccount")
    public String show(@RequestParam("entityId") long id, Model model) {
        … // 何らかの処理
    }
}
URLの一部を引数に取る
@PathVariable
@PathVariableアノテーションでURLの一部を引数に取ることができる。
以下の例は、http://localhost:8080/accounts/123をRequestとして受け取った例。引数のidには123が格納される。
@Controller
public class AccountController {
    @GetMapping("/accounts/{accountId}")
    public String show(@PathVariable("accountId") long id, Model model) {
        … // 何らかの処理
    }
}
もっとシンプルに書く
URLの{accountId}と引数のaccountIdの名称を一致させることで、以下のようにも記述できる。こちらのほうがシンプル。
@GetMapping("/accounts/{accountId}")
public String show(@PathVariable long accountId, Model model)
注意点として、コンパイル時に、
javac -parameters
と-parametersを付ける必要がある(JDK 8+が条件)。
Javaはデフォルト設定でコンパイルすると、引数がvar1、var2のような適当な変数名に置換されてしまうため、上記で説明した方法がうまく動かない。
ちなみに、Spring Bootではデフォルトで上記の設定になっているので、気にする必要がない。
@RequestParamと@PathVariableの違い
パラメータとして値を渡すか、URLの一部に値を組み込んで渡すかの違い。
リクエストパラメータに特定の値をもたせるよりも、パスに特定の値をもたせたほうがシンプル。
@RequestParamと@PathVariableの事例
http://localhost:8080/accounts
@GetMapping("/accounts")
public String show(HttpServletRequest request, Model model)
http://.../orders/1234/items/2
@GetMapping("/orders/{id}/items/{itemId}")
public String show(@PathVariable(“id”) Long orderId,
                   @PathVariable int itemId,
                   Model model, Locale locale,
                   @RequestHeader(“user-agent”) String agent )
http://.../orders?orderId=1234&item=2
@GetMapping("/orders")
public String show(@RequestParam Long orderId,
                   @RequestParam(“item”) int itemId,
                   Principal user, Map<String,Object> model,
                   HttpSession session )
Viewとしてサポートしているもの
Viewとは、Webブラウザに出力するHTMLをレンダリングする部分。
Spring MVCがサポートするViewは以下の通り。
- Thymeleaf
- FreeMarker
- JSP
- Excel
などなど。
基本的に、Spring MVCは上記のViewをサーバサイドレンダリングしている。
推奨
Thymeleafが75%シェアでおすすめ。次に、FreeMarkerがよく使われている。
警告
JSPはクロスサイトスクリプティングの脆弱性を持つので、新規の開発では用いない。
ViewResolver
View Resolverインターフェースは、テンプレートエンジンに合わせて用意されている。 論理パスを完全なパスに置換して、DispatcherServletに返す役割を担う。
以下に、Mustacheを使った例を示す。
このようにPrefixとSuffixを設定しておく。
@Bean
public ViewResolver resolver(Compiler mustacheRuntime) {
    MustacheViewResolver mvr = new MustacheViewResolver();
    mvr.setPrefix ( "classpath:/templates/" );
    mvr.setSuffix ( ".html" );
    return mvr;
}
@xxxMapingアノテーションで指定した論理パスを、ViewResolverが以下のような完全なパスに置換する。
Prefix + @xxxMappingアノテーションの値 + Suffix
Spring Bootの場合
Spring Bootの場合、以下の例のようにapplication.propertiesに定義しておく。
spring.mustache.prefix=classpath:/templates/
spring.mustache.suffix=.html
Spring BootでSpring MVCを使う場合
1. pom.xmlの定義
<dependency>
    <groupId>org.springframework.boot</groupId>
    <artifactId>spring-boot-starter-web</artifactId>
</dependency>
デフォルトでTomcatサーバが組み込まれているが、他のものに変更したい場合は以下のように設定する(Jettyに変える場合)。
<dependency>
    <groupId>org.springframework.boot</groupId>
    <artifactId>spring-boot-starter-web</artifactId>
    <exclusions>
        <exclusion>
            <groupId>org.springframework.boot</groupId>
            <artifactId>spring-boot-starter-tomcat</artifactId>
        </exclusion>
    </exclusions>
</dependency>

<dependency>
    <groupId>org.springframework.boot</groupId>
    <artifactId>spring-boot-starter-jetty</artifactId>
</dependency>
fat JARをビルドするのに、以下の設定も必要。
<build>
    <plugins>
        <plugin>
            <groupId>org.springframework.boot</groupId>
            <artifactId>spring-boot-maven-plugin</artifactId>
        </plugin>
    </plugins>
</build>
2. Controllerクラスの設計
@Controller
public class RewardController {

    private RewardLookupService lookupService;

    // ビジネスロジッククラスのインジェクション
    @Autowired
    public RewardController(RewardLookupService svc) {
        this.lookupService = svc;
    }

    // 論理パスに対応する処理(メソッド)
    @GetMapping("/rewards/{id}")
    public String show(@PathVariable("id") long id, Model model) {
        Reward reward = lookupService.lookupReward(id);
        model.addAttribute(“reward”, reward);
        return “rewardView”;
    }
}
3. ViewResolverの設定
以下のように、ViewResolverを設定しておく。
以下、Spring Bootのドキュメントから抜粋。
# THYMELEAF (ThymeleafAutoConfiguration)
spring.thymeleaf.prefix=classpath:/templates/ # Prefix that gets prepended to view names when building a URL.
spring.thymeleaf.suffix=.html                 # Suffix that gets appended to view names when building a URL.
4. テンプレートViewの用意
テンプレートエンジンによるので割愛。
@EnableWebMvc
Spring Bootを使っていない場合、このアノテーションを付けてSpring MVCの設定を行う。
TIP
@EnableXxxはSpringの特定の機能を有効化するものであり、Spring BootではAutoConfiguration用のクラスですべて定義済みである。
そのため、不用意に上記のアノテーションを付けてしまうと、Spring Bootが動かなくなる一因となる。
静的ファイルの扱い(画像データ、CSSファイルなどなど)
テンプレートViewだと、/src/main/resources/resources/templates直下など使えるパスが決まっている。
[WIP] 積み残し課題(重要度低)
- What are some of the parameter types for a controller method?
- What other annotations might you use on a controller method parameter? (You can ignore form-handling annotations for this exam)
- What are some of the valid return types of a controller method?
- How is the right View chosen when it comes to the rendering phase?
- Why do you have access to the model in your View? Where does it come from?
- What is the purpose of the session scope?
- What is the default scope in the web context?
- Why are controllers testable artifacts?