Spring Conteiner, Dependency Injection
Dependency Injectionとその利点
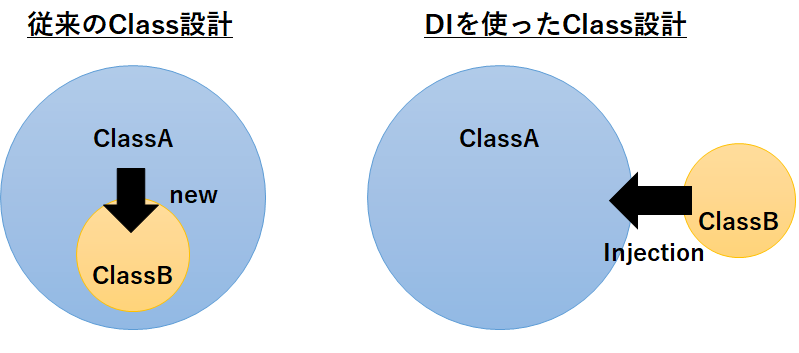
Dependency Injection (DI)は「依存性の注入」と訳される。
必要なインスタンス(依存性)を外から代入することで、各モジュールが疎結合になるように設計する。
硬い言葉で表現すると、あるオブジェクトに対して、利用(依存)しているオブジェクトを注入することで、オブジェクト間の依存関係を作成する。

DIを行うメリットとしては、
- クラス間・Layer間を疎結合化できる。
- Unitテストがしやすくなる(Testabilityの向上)
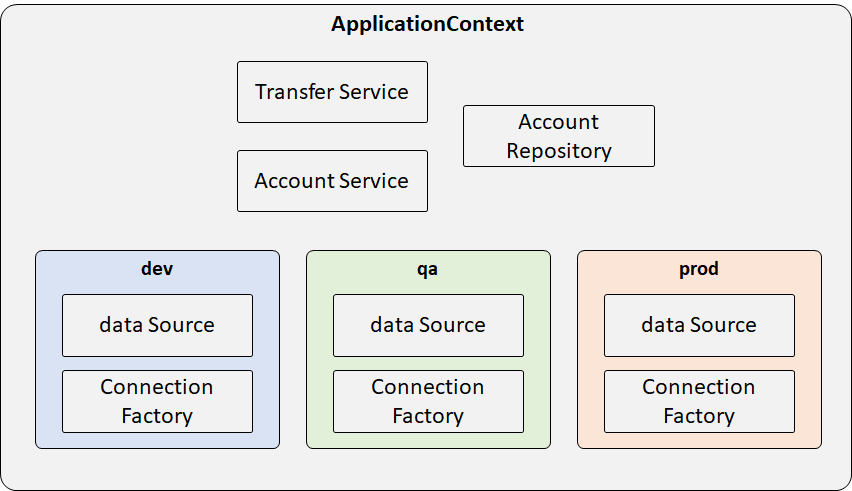
- インスタンスの差し替えなどが可能となる(例えば、テスト時に開発系・テスト系・本番系のデータアクセスクラスを用意してDIしたり)。
などが挙げられる。
Spring FrameworkにおけるDIの方法
- Javaコンフィグファイル
- アノテーション
- XML (→古いのでほとんど使われない)
注意
XMLによる設定はすでにレガシーなので、原則的には使わないようにしましょう。
参考
初めてでも30分で分かるSpring 5 & Spring Boot 2オーバービュー
パターン・アンチパターンとは。DIとはパターンなのか?
アンチパターンとは、推奨されない設計のことを指す。
DIも設計パターンの一部と言える。
従来型のクラス設計(Servlet、ビジネスロジック、DAO、DTO)は、お互いが密結合になりがち。 結果として、改修を重ねるごとに改修の難易度が増す(ビジネスロジックの複雑化・肥大化が原因の1つ)。
DIを利用したクラス設計を行うことで、上記の各クラスが疎結合化し、関心事の分離が可能となる。 結果として、コードがスッキリする。
インターフェイスとその利点
DIを行う上で、インターフェイスの用意は必須と言える。
(DIの利点ではないが)インターフェイスを用意することで、ポリモーフィズムの活用などでメリットが生まれる。
1. JDK Proxy
インターフェイスを実装したクラスにインジェクション(Spring FrameworkだとこちらがDefault。インターフェイス持たないクラスの場合、CGlib Proxyに処理を委譲する仕組みになっている)
当たり前だが、インターフェイスを持たないクラスをProxy化することはできない。
2. CGlib Proxy
スーパークラスを継承したクラスにインジェクション(Spring BootだとこちらがDefault)
スーパークラス側でfinalのついたクラス・メソッドは継承・オーバーライドができないため、それらのクラスはProxy化することができない。
Spring beansでインターフェイスの利用が推奨される理由
Spring FrameworkではJDK Proxyがデフォルトとなっており、JDK ProxyによるProxy生成の前提条件として、インターフェースの実装があるため。
application-contextとはSpringが管理するコンテナのこと
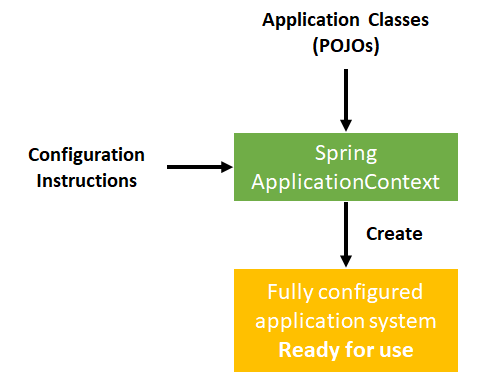
SpringのConfigurationクラスやApplicationクラスをインスタンス化する(これらインスタンスのことをBeanと呼ぶ)と、SpringのコンテナであるApplicationContext下で管理される。

Applicationクラスの例。
public class TransferServiceImpl implements TransferService {
    // Needed to perform moneytransfers between accounts
    public TransferServiceImpl(AccountRepository ar) {
        this.accountRepository = ar;
    }
}

public class JdbcAccountRepository implements AccountRepository {
    // Needed to load accounts from the database
    public JdbcAccountRepository(DataSource ds) {
        this.dataSource = ds;
    }
}
Configurationクラス(Configuration Instructions)の例。
@Configuration
public class ApplicationConfig{
    @Bean
    public TransferService transferService(){
        return new TransferServiceImpl(accountRepository());
    }

    @Bean
    public AccountRepository accountRepository(){
        return new JdbcAccountRepository(dataSource());
    }

    @Bean
    public DataSource dataSource(){
        BasicDataSource dataSource = New BasicDataSource();
        dataSource.setDriverClassName("org.postgresql.Driver");
        dataSource.setUrl("jdbc:postgresql://localhost/transfer");
        dataSource.setUsername("user");
        dataSource.setPassword("password");
        return dataSource;
    }
}
実行クラスの例。
// Create the application from the configuration
ApplicationContext context =
    SpringApplication.run( ApplicationConfig.class );

// Look up the application service interface
// "transferService"がBean IDとなる。
TransferService service =
    context.getBean(“transferService”, TransferService.class);

// Use the application
service.transfer(new MonetaryAmount(“300.00”), “1”, “2”);
BeanへのアクセスはBean IDがユニークである場合に限り、以下のようにBean IDを省略できる(基本的に、Bean IDはユニークであるように設計するため、以下の書き方が一般的)。
// No need for bean id if type is unique
TransferService ts3 = context.getBean(TransferService.class);
JUnitのテストクラス作成(DIしない場合の例)
public class TransferServiceTests {

    private TransferService service;

    @BeforeEach
    public void setUp() {
        // Create the application from the configuration
        ApplicationContext context =
            SpringApplication.run( ApplicationConfig.class );

        // Look up the application service interface
        service = context.getBean(TransferService.class);
    }

    @Test public void moneyTransfer() {
        Confirmation receipt =
            service.transfer(new MonetaryAmount("300.00"), "1", "2"));

        Assert.assertEquals("500.00", receipt.getNewBalance());
    }
}
複数ファイルからApplicationContextを作成する
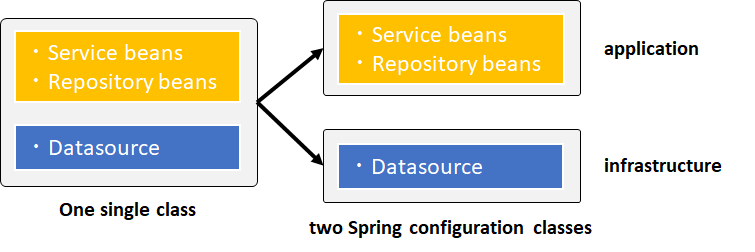
@Configurationアノテーションを付けたクラスは長くなりがちなので、分割しておくことができる。
特定のConfigクラスを読み込むには、@Importアノテーションをつけて、読み込むクラス名を指定する。
大元のConfigクラス。ApplicationConfigクラスとWebConfigクラスをインポートしている。
@Configuration
@Import({ApplicationConfig.class, WebConfig.class })
public class InfrastructureConfig {
    ...
}
インポートされるConfigクラスたち。
@Configuration
public class ApplicationConfig {
    ...
}

@Configuration
public class WebConfig {
    ...
}
Application BeansとInfrastructure Beansを分離しておくのがBest Practices。

以下に2つに分割する前の例を示す。
@Configuration
public class ApplicationConfig{
    @Bean
    public TransferService transferService(){
        return new TransferServiceImpl(accountRepository());
    }

    @Bean
    public AccountRepository accountRepository(){
        return new JdbcAccountRepository(dataSource());
    }
------------------------------------------------------------------
    @Bean
    public DataSource dataSource(){
        BasicDataSource dataSource = New BasicDataSource();
        dataSource.setDriverClassName("org.postgresql.Driver");
        dataSource.setUrl("jdbc:postgresql://localhost/transfer");
        dataSource.setUsername("user");
        dataSource.setPassword("password");
        return dataSource;
    }
}
以下に分割後の例を示す。
ApplicationConfigクラス内のBeanは、インポート先のTestInfrastructureConfigクラスのDataSourceのBeanに依存している。
DataSourceのBeanを使うために、@Autowiredアノテーションを使って、別のconfigクラスのBeanを取得する(これをインジェクションという)。コンストラクタでインジェクションするのが普通。
ただし、configクラス内でコンストラクタが1つの場合、@Autowiredアノテーションを省略することができる。
@Configuration
public class ApplicationConfig {

    private final DataSource dataSource;

    @Autowired
    public ApplicationConfig(DataSource ds) {
        this.dataSource = ds;
    }

    @Bean
    public TransferService transferService() {
        return new TransferServiceImpl ( accountRepository() );
    }

    @Bean
    public AccountRepository accountRepository(DataSource dataSource) {
        return new JdbcAccountRepository( dataSource );
    }
}
@Configuration
@Import(ApplicationConfig.class)
public class TestInfrastructureConfig {
    @Bean
    public DataSource dataSource() {
        ...
    }
}
Beanのスコープ
Singletonスコープ
デフォルトのスコープはsingleton。
@Bean
@Scope(“singleton”)
public AccountService accountService() {
    return ...
}
インスタンスが作られるのは1回きり。2回目は同じインスタンスが使い回される。
AccountService service1 = (AccountService) context.getBean(“accountService”);
AccountService service2 = (AccountService) context.getBean(“accountService”);
assert service1 == service2; // True – same object
- Springアプリケーションは複数リクエストに対して、マルチスレッドで処理。
- スレッドセーフでなければならない(Stateless・Immutable beans)。
Protptypeスコープ
@Bean
@Scope(“prototype”)
public AccountService accountService() {
    return …
}
毎回新しいインスタンスが生成される。
AccountService service1 = (AccountService) context.getBean(“accountService”);
AccountService service2 = (AccountService) context.getBean(“accountService”);
assert service1 != service2; // True – different objects
Spring側で用意されているスコープ
| スコープ名 | 説明 |
|---|---|
| singleton | 1つのインスタンスが作られる |
| prototype | 新しいインスタンスが毎回作られる |
| session | 新しいインスタンスがユーザごとに1つ作られる |
| request | 新しいインスタンスがリクエストごとに1つ作られる |
ほとんどの場合は、singleton。sessionを時々使う。他のスコープはまず使わない。
prototypeの場合、Springのコンテナ管理外となる。その場合、生成されたBeanはJavaのガベージコレクション(GA)の対象となり、普通のJavaのインスタンスとして扱われる。
環境設定(Environmentオブジェクトとして読み込み)の読み込み
以下の順番で、環境設定を読み込む(外から変えられるものから読み込まれる)。
- Servlet Contextパラメータ(web.xml)
- JNDI (Java Naming and Directory Interface)
- JVMシステムプロパティ(java -Dxxx=yyy)
- OS環境変数(Cloudでよく使う)
- Javaプロパティファイル
環境変数の読み込み例
環境設定(app.properties)から取得した値を変数に格納して、引数として取る。
@Configuration
public class DbConfig {

    Environment env;

    @Autowired
    public DbConfig(Environment env) {
        this.env = env;
    }

    @Bean
    public DataSource dataSource() {
        BasicDataSource ds = new BasicDataSource();
        ds.setDriverClassName( env.getProperty( "db.driver" ));
        ds.setUrl( env.getProperty( "db.url" ));
        ds.setUser( env.getProperty( "db.user" ));
        ds.setPassword( env.getProperty( "db.password" ));
        return ds;
    }
}
app.properties
db.driver=org.postgresql.Driver
db.url=jdbc:postgresql:localhost/transfer
db.user=transfer-app
db.password=secret45
Javaプロパティファイルを読み込むには、@PropertySourceアノテーションを用いてファイルパスを指定する。
@Configuration
@PropertySource ( "classpath:/com/organization/config/app.properties" )
@PropertySource ( "file:config/local.properties" )
public class ApplicationConfig {
    ...
}
環境変数(プロパティ)にアクセスする
@Valueアノテーションを用いて、引数に値を代入することで、プロパティにアクセスすることもできる。Environmentオブジェクトをわざわざ用意する必要がなくなる。
@Configuration
public class DbConfig {
    @Bean
    public DataSource dataSource(
            @Value("${db.driver}") String driver,
            @Value("${db.url}") String url,
            @Value("${db.user}") String user,
            @Value("${db.password}") String pwd) {
        BasicDataSource ds = new BasicDataSource();
        ds.setDriverClassName(driver);
        ds.setUrl(url);
        ds.setUser(user);
        ds.setPassword(pwd);
        return ds;
    }
}
開発系・テスト系・本番系で環境変数(プロパティ)を変更する
${ENV}を変数にして、複数のプロパティファイルに対応できる。
@PropertySource ( "classpath:/com/acme/config/app-${ENV}.properties" )
開発系app-dev.properties
db.driver=org.postgresql.Driver
db.url=jdbc:postgresql://localhost/transfer
db.user=transfer-app
db.password=secret45
テスト系app-qa.properties
db.driver=org.postgresql.Driver
db.url=jdbc:postgresql://qa/transfer
db.user=transfer-app
db.password=secret88
本番系app-prod.properties
db.driver=org.postgresql.Driver
db.url=jdbc:postgresql://prod/transfer
db.user=transfer-app
db.password=secret99
プロファイルを用いてBeanをグループ化
Beanをプロファイルでグループ化することができる。
グループに属していないBeanはいつでも使われる。

@ProfileでJava configクラスがどのグループに属するか決められる(メソッド単位で付けられる)。
@Configuration
@Profile("dev")
public class DevConfig {
@Bean
public DataSource dataSource() {
    EmbeddedDatabaseBuilder builder = new EmbeddedDatabaseBuilder();
    return builder.setName("testdb")
        .setType(EmbeddedDatabaseType.HSQL)
        .addScript("classpath:/testdb/schema.db")
        .addScript("classpath:/testdb/test-data.db").build();
}
開発用と本番用で同じBean ID名・異なるメソッド名を付けて、@Profileアノテーションで開発用と本番用を使い分ける。
@Configuration
public class DataSourceConfig {
    // 開発用
    @Bean(name="dataSource")
    @Profile("dev")
    public DataSource dataSourceForDev() {
        EmbeddedDatabaseBuilder builder = new EmbeddedDatabaseBuilder();
        return builder.setName("testdb") ...
    }

    // 本番用
    @Bean(name="dataSource")
    @Profile("prod")
    public DataSource dataSourceForProd() {
        BasicDataSource dataSource = new BasicDataSource();
        ...
        return dataSource;
    }
特定のプロファイル(グループ)から除外する
!を付けてプロファイルを指定することで、そのプロファイルから除外することができる。以下の例では、dev以外でBeanが使われる。
@Configuration
@Profile("!dev")
public class DevConfig {
    …
}
プロファイルを有効化する方法
JVMシステムプロパティ
-Dspring.profiles.active=dev,jpa
Java config
System.setProperty("spring.profiles.active", "dev,jpa");
SpringApplication.run(AppConfig.class);
テスト時
@ActiveProfilesアノテーションを使う。
プロパティファイルの選択(開発系・本番系)
開発系
開発用のプロパティファイルdev.propertiesを読み込む。
プロファイルはdevを使う。
@Configuration
@Profile(“dev”)
@PropertySource ( “dev.properties” )
class DevConfig { … }
本番系
開発用のプロパティファイルprod.propertiesを読み込む。
プロファイルはprodを使う。
@Configuration
@Profile(“prod”)
@PropertySource ( “prod.properties” )
class ProdConfig { … }
Spring Expression Language(SpEL)
後回し(p.95)。
アノテーションによるBean設定方法
これまでの説明では、@BeanアノテーションによりインジェクションするBeanをJavaコンフィグファイルにいちいち記述していた。
実は、Beanにするクラスに@Componentアノテーションを付け、Javaコンフィグクラスに@ComponentScanアノテーションをつけることによって@Beanを付ける必要がなくなる。
このときのBean IDは、メソッド名になる(明示しない場合は)。
@Component
public class TransferServiceImpl implements TransferService {
    @Autowired
    public TransferServiceImpl(AccountRepository repo) {
    this.accountRepository = repo;
    }
}
com.bankパッケージ以下にあるクラス(コンポーネント)をスキャンし、Beanを作る。
@Configuration
@ComponentScan("com.bank")
public class AnnotationConfig {
    // No bean definition needed any more
}
Bean IDの定義
- Bean IDを明示的に記述
- メソッドの頭文字を小文字にしたBean IDになる
2がほとんど。
インジェクション(@Autowired)ができる箇所
基本的に、コンストラクタでインジェクションする。
1. コンストラクタインジェクション
循環参照するケースでは、コンストラクタではだめ(あまりない)。
@Autowired
public TransferServiceImpl(AccountRepository a) {
    this.accountRepository = a;
}
@Value
@Autowired
public TransferServiceImpl(@Value("${daily.limit}") int max) {
    this.maxTransfersPerDay = max;
}
2. メソッド(Setter)インジェクション
Immutableにできない。何度も値がセットされるリスクがある。
@Autowired
public void setAccountRepository(AccountRepository a) {
    this.accountRepository = a;
}
@Value
@Autowired
public void setDailyLimit(@Value("${daily.limit}") int max) {
    this.maxTransfersPerDay = max;
}
3. フィールドインジェクション
フィールド変数はプライベート変数であるため、単体テストがしにくい。
@Autowired
private AccountRepository accountRepository;
@Value
@Value("#{environment['daily.limit']}")
int maxTransfersPerDay;
参考
http://olivergierke.de/2013/11/why-field-injection-is-evil/
インジェクション対象が曖昧なケース
@Component
public class TransferServiceImpl implements TransferService {
    @Autowired
    public TransferServiceImpl(AccountRepository accountRepository) { … }
}
以下のように、AccountRepositoryインターフェースを実装したクラスが2つある場合、どちらをインジェクションしたらいいか判断できないため、NoSuchBeanDefinitionException例外が発生する。
@Component
public class JpaAccountRepository implements AccountRepository {..}
---------------------------------------------------------------------
@Component
public class JdbcAccountRepository implements AccountRepository {..}
解決策
@Qualifierアノテーションを使い、インジェクション対象のBean IDを明示する。
@Component("transferService")
public class TransferServiceImpl implements TransferService {
    @Autowired
    public TransferServiceImpl( @Qualifier("jdbcAccountRepository")
                                AccountRepository accountRepository) { … }
}
@Component("jdbcAccountRepository")     // Bean ID
public class JdbcAccountRepository implements AccountRepository {..}
---------------------------------------------------------------------
@Component("jpaAccountRepository")      // Bean ID
public class JpaAccountRepository implements AccountRepository {..}
基本的に、Bean IDはユニークになるように設計する(上記の例はしょうがないにしても)。
Delayed Initialization
基本的に、ApplicationContext(Springのコンテナ)が作成されたタイミングで、Beanが生成される。
しかし、@Lazyアノテーションをつけると、最初に使われるタイミングでBeanが生成される(ApplicationContext.getBeanメソッド実行時)。
Beanが生成されるタイミングでSMTPサーバが起動していない場合
@Lazy @Component
public class MailService {
    public MailService(@Value("smtp:...") String url) {
        // connect to mail-server
    }
…
}
まず使うことはない…。@Lazyを使っても起動が早くなるわけではない。
Javaコンフィグとアノテーションの比較
基本的には、可能な限りアノテーションを利用して、それ以外をJavaコンフィグで記述する。
Javaコンフィグ
@Configuration
public class TransferConfiguration
    @Bean(name="transferService")
    @Scope("prototype")
    @Profile("dev")
    @Lazy(false)
    public TransferService tsvc() {
        return new TransferServiceImpl(accountRepository());
    }
}
アノテーション
@Component("transferService")
@Scope("prototype")
@Profile("dev")
@Lazy(false)
public class TransferServiceImpl implements TransferService {
    @Autowired
    public TransferServiceImpl (AccountRepository accRep) { … }
}
コンポーネントスキャン
コンポーネントスキャンの範囲が多いと、起動時間が長くなる。そのため、スキャン対象の範囲はできるだけ小さくすることが重要。
良くない例
@ComponentScan ({"org", "com"})
-------------------------------
@ComponentScan ("com")
良い例
@ComponentScan ("com.bank.app")
-------------------------------
@ComponentScan ({"com.bank.app.repository", "com.bank.app.service", "com.bank.app.controller"})
DI後の初期化処理とBeanインスタンスを破棄する前の処理
@PostConstructアノテーションはDI後の初期化処理(メソッド)につける。すべてのDIが終わった後に呼ばれる。コンストラクタはDIのみに使い、その他の初期化処理はこのアノテーションを付けて行う。
@PreDestoryアノテーションは、Beanインスタンスが破棄される直前に呼ばれる。
引数なし・戻り値なしでないと使えない。
public class JdbcAccountRepository {
    @PostConstruct
    void populateCache() { }

    @PreDestroy
    void flushCache() { }
}
@PostContruct
Setterメソッドが呼ばれた後、実行される。
public class JdbcAccountRepository {

    private DataSource dataSource;

    @Autowired
    public void setDataSource(DataSource dataSource){
        this.dataSource = dataSource;

    }
    @PostConstruct
    public void populateCache(){
        Connection conn = dataSource.getConnection();
    }
}
Constructer called -> Setter called(setDataSource) -> PostConstructメソッド called(populateCache)
@PreDestroy
一般的には、アプリケーションが終了する際に呼ばれる(プロセスがKillされたかどうかは関係ない)。リソースの開放を行う。
ConfigurableApplicationContext context = …;
// Triggers call of all @PreDestroy annotated methods
context.close();
context.close()が呼ばれる前の段階で、以下の@PreDestoryアノテーションのついたメソッドが呼ばれる。
public class JdbcAccountRepository {
    @PreDestroy
    public void flushCache() { … }
    ...
}
ステレオタイプアノテーション
@Componentアノテーションの子アノテーションとして、いくつか別のアノテーションがある。いずれもコンポーネントスキャンの対象となる。
@Service
@Repository
@Controller
@RestController
@Configuration
[WIP] 積み残し課題
- What is the concept of a “container” and what is its lifecycle?
- How are you going to create a new instance of an ApplicationContext?
- Can you describe the lifecycle of a Spring Bean in an ApplicationContext?
- How are you going to create an ApplicationContext in an integration test test?
- What is the preferred way to close an application context? Does Spring Boot do this for you?
- Dependency injection using annotations (@Component, @Autowired)?
- Component scanning, Stereotypes and Meta-Annotations?
- Are beans lazily or eagerly instantiated by default? How do you alter this behavior?
- What is a BeanFactoryPostProcessor and what is it used for? When is it invoked?
- Why would you define a static @Bean method?
- What is a ProperySourcesPlaceholderConfigurer used for?
- What is a BeanPostProcessor and how is it different to a BeanFactoryPostProcessor?
- What do they do? When are they called?
- What is an initialization method and how is it declared on a Spring bean?
- What is a destroy method, how is it declared and when is it called?
- Consider how you enable JSR-250 annotations like @PostConstruct and @PreDestroy? When/how will they get called?
- How else can you define an initialization or destruction method for a Spring bean?
- What does component-scanning do?
- What is the behavior of the annotation @Autowired with regards to field injection, constructor injection and method injection?
- What do you have to do, if you would like to inject something into a private field? Ho does this impact testing?
- How does the @Qualifier annotation complement the use of @Autowired?
- What is a proxy object and what are the two different types of proxies Spring can create?
- What are the limitations of these proxies (per type)?
- What is the power of a proxy object and where are the disadvantages?
- What are the advantages of Java Config? What are the limitations?
- What does the @Bean annotation do?
- What is the default bean id if you only use @Bean? How can you override this?
- Why are you not allowed to annotate a final class with @Configuration
- How do @Configuration annotated classes support singleton beans?
- Why can’t @Bean methods be final either?
- How do you configure profiles?, What are possible use cases where they might be useful?
- Can you use @Bean together with @Profile?
- Can you use @Component together with @Profile?
- How many profiles can you have?
- How do you inject scalar/literal values into Spring beans?
- What is @Value used for?
- What is Spring Expression Language (SpEL for short)?
- What is the Environment abstraction in Spring?
- Where can properties in the environment come from – there are many sources for properties – check the documentation if not sure. Spring Boot adds even more.
- What can you reference using SpEL?
- What is the difference between $ and # in @Value expressions?